WP Engine Deployments via Azure Devops Pipelines
There is a well documented support article on how to do continuous integration on WP Engine with Bitbucket, but nothing that I could find for Azure Devops. This walkthrough will document how to do deployments to WP Engine site utilizing Azure Devops. I’ve set this up as a template instead of a single YAML file, so that it’s easier to deploy across multiple sites with only a couple of small tweaks on your parameters.
Table of Contents
- Configure WP Engine
- Create Your YAML Pipeline Files
- Add SSH Key to Azure Devops
- Create a Pipeline
- Run Your Pipeline
- Some Notes
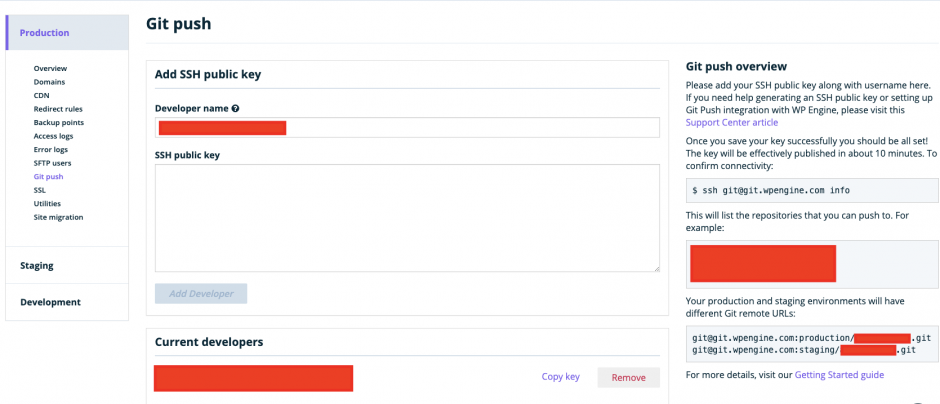
Configure WP Engine
- Make sure you have an SSH Key ready to add to your site.
- Log in to WP Engine and open your site
- Click on “Git Push” in the sidebar menu
- Add your name and SSH Public Key
- Click Add Developer
- Note the “Production” url on the right side of the screen, it should look something like this “git@git.wpengine.com:production/mysitename.git” (unless you are needing to push to the legacy staging site, you only need to worry about the production url)
- Repeat this process if you have a staging and development site, also noting the “production” url for those sites as well.
Create Your YAML Pipeline Files
- Create a file called azure-pipelines.yml in the root of your repository with the following code:
trigger:
- deploy/production
- deploy/staging
- deploy/development

pool:
  vmImage: 'ubuntu-latest'

extends:
  template: wpengine-pipeline.template.yml
  parameters:
    gitEmail: 'youremail@yourdomain.com'
    gitUser: 'Your Name'
    productionGit: 'git@git.wpengine.com:production/yourprodsite.git'
    productionBranch: 'deploy/production'
    stagingGit: 'git@git.wpengine.com:production/yourstagingsite.git'
    stagingBranch: 'deploy/staging'
    developmentGit: 'git@git.wpengine.com:production/yourdevsite.git'
    developmentBranch: 'deploy/development'
2. Replace the parameters in this file with values from your site, such as the branches you want the pipeline to run on, your email, your name, and the git urls that we noted from the section above
3. Create a file called wpengine-pipeline.template.yml in the root of your repository with the following code:
variables:
- group: ssh-info
- name: phpVersion
  value: 7.2

parameters:
- name: gitEmail
  type: string
  default: ''
- name: gitUser
  type: string
  default: ''
- name: productionGit
  type: string
  default: ''
- name: productionBranch
  type: string
  default: 'deploy/production'
- name: stagingGit
  type: string
  default: ''
- name: stagingBranch
  type: string
  default: 'deploy/staging'
- name: developmentGit
  type: string
  default: ''
- name: developmentBranch
  type: string
  default: 'deploy/development'

steps:
- checkout: self
  persistCredentials: true

- task: InstallSSHKey@0
  inputs:
    knownHostsEntry: '$(knownHostsEntry)'
    sshPublicKey: '$(sshPublicKey)'
    sshKeySecureFile: 'id_rsa_azure'

- task: Bash@3
  condition: and(eq(variables['build.sourceBranch'], 'refs/heads/${{ parameters.productionBranch }}'), ne('${{ parameters.productionGit }}', ''), ne('${{ parameters.productionBranch }}', ''))
  displayName: "Push to WPEngine Prod"
  inputs:
    targetType: 'inline'
    script: |
      git config --global user.email "${{ parameters.gitEmail }}"
      git config --global user.name "${{ parameters.gitUser }}"
      git checkout ${{ parameters.productionBranch }}
      find . -name ".gitignore" -exec rm -f {} \;
      git add .
      git commit -m "Push to WPEngine"
      git push -f ${{ parameters.productionGit }} ${{ parameters.productionBranch }}

- task: Bash@3
  condition: and(eq(variables['build.sourceBranch'], 'refs/heads/${{ parameters.stagingBranch }}'), ne('${{ parameters.stagingGit }}', ''), ne('${{ parameters.stagingBranch }}', ''))
  displayName: "Push to WPEngine Staging"
  inputs:
    targetType: 'inline'
    script: |
      git config --global user.email "${{ parameters.gitEmail }}"
      git config --global user.name "${{ parameters.gitUser }}"
      git checkout ${{ parameters.stagingBranch }}
      find . -name ".gitignore" -exec rm -f {} \;
      git add .
      git commit -m "Push to WPEngine"
      git push -f ${{ parameters.stagingGit }} ${{ parameters.stagingBranch }}

- task: Bash@3
  condition: and(eq(variables['build.sourceBranch'], 'refs/heads/${{ parameters.developmentBranch }}'), ne('${{ parameters.developmentGit }}', ''), ne('${{ parameters.developmentBranch }}', ''))
  displayName: "Push to WPEngine Development"
  inputs:
    targetType: 'inline'
    script: |
      git config --global user.email "${{ parameters.gitEmail }}"
      git config --global user.name "${{ parameters.gitUser }}"
      git checkout ${{ parameters.developmentBranch }}
      find . -name ".gitignore" -exec rm -f {} \;
      git add .
      git commit -m "Push to WPEngine"
      git push -f ${{ parameters.developmentGit }} ${{ parameters.developmentBranch }}
4. This file shouldn’t need any changes unless there are any default values you would like to carry over between sites.
5. Commit both files
Add SSH Key to Azure Devops
- Open your project in Azure Devops
- Open Pipelines in the left menu
- Open the library section under Pipelines
- Click on Secure files in the tab on the top
- Click the “+” to add a new file
- Upload your private key as “id_rsa_azure” (or change out your template above if you want your file named differently)
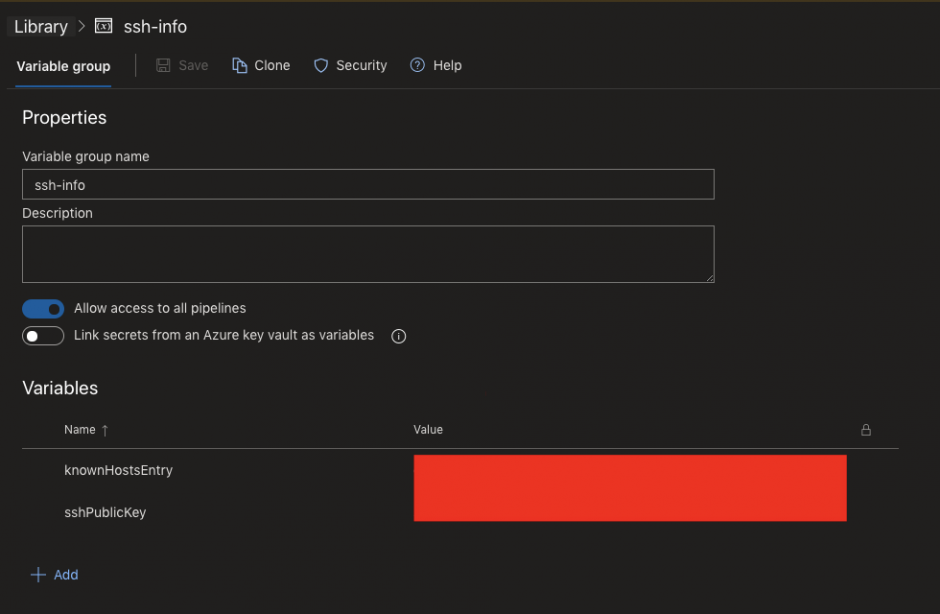
- Click on Variable Groups at the top
- Create a new variable group
- Name the variable group “ssh-info” (or change out the template with the group name you would like to add)
- Add an entry for “knownHostsEntry” and add the host entry for WP Engine (I was able to find this by “ssh git@git.wpengine.com info” from my local computer where my key was installed, and grabbing the host entry from ~/.ssh/known_hosts
- Add an entry for “sshPublicKey” with the value from your public key (the same one you input into WP Engine)
Create A Pipeline
- Go to the Azure Devops Project
- Open Pipelines on the left Menu
- Click “New Pipeline”
- Select “Azure Repos Git”
- Select your repository
- Select “Existing Azure Pipelines YAML File”
- Select the branch you have the .yml files committed to
- Select “azure-pipelines.yml”
- Select the dropdown next to “Run” and click save (this will create the pipeline for you, but not run it)
Run Your Pipeline
- Manually
- Open your project
- Click on the Pipelines menu item
- Select the pipeline you’d like to run
- Click the “Run Pipeline” menu item
- Select the Branch you’d like to run the pipeline against
- Click Run
- Automatically
- Push to any of the branches under “trigger” in our template, and Azure Devops, will pick it up and automatically run the pipeline for you. This allows you full control to do continuous integration as well as hook into other CI/CD tools inside of your pipeline
Some Notes
- I had the need to push to multiple WP Engine sites at once that are all on the same codebase. I tested with running one pipeline but ended up having issues because of how long a single deployment takes, with 10 running back to back, it pushed me over the 60 minute limit. To get around this, I ran my deployments concurrently. Here’s a code snippet that shows how you can do that with Azure Pipelines. Since it’s running a bash script, we can just add an “&” to the end of each line that we want to run concurrently, and it will fire all of them off at the same time.
git push -f git@git.wpengine.com:production/site1.git ${{ parameters.productionBranch }} &
git push -f git@git.wpengine.com:production/site2.git ${{ parameters.productionBranch }} &
git push -f git@git.wpengine.com:production/site3.git ${{ parameters.productionBranch }} &
git push -f git@git.wpengine.com:production/site4.git ${{ parameters.productionBranch }} &
git push -f git@git.wpengine.com:production/site5.git ${{ parameters.productionBranch }} &
git push -f git@git.wpengine.com:production/site6.git ${{ parameters.productionBranch }} &
git push -f git@git.wpengine.com:production/site7.git ${{ parameters.productionBranch }} &
git push -f git@git.wpengine.com:production/site8.git ${{ parameters.productionBranch }} &
git push -f git@git.wpengine.com:production/site9.git ${{ parameters.productionBranch }} &
git push -f git@git.wpengine.com:production/site10.git ${{ parameters.productionBranch }} - You can hook into other testing tools via your pipeline as well, here’s an example of a script that utilizes Browserstack to do automated browser testing. This sets up php, runs composer to install the dependencies for php-unit, and runs a parallel browser check. I’ll write up more in depth instructions in a later post on how to do this in depth.
- script: |
    sudo update-alternatives --set php /usr/bin/php$(phpVersion)
    sudo update-alternatives --set phar /usr/bin/phar$(phpVersion)
    sudo update-alternatives --set phpdbg /usr/bin/phpdbg$(phpVersion)
    sudo update-alternatives --set php-cgi /usr/bin/php-cgi$(phpVersion)
    sudo update-alternatives --set phar.phar /usr/bin/phar.phar$(phpVersion)
    php -version
  displayName: 'Use PHP version $(phpVersion)'

- script: composer install --no-interaction --prefer-dist
  displayName: 'composer install'

- task: BrowserStackConfig@0
  inputs:
    BrowserStackServiceEndPoint: 'Browserstack'

- script: |
      TEST_URL="${{ parameters.productionUrl }}" CONFIG_FILE=config/parallel.conf.json php lib/parallel.php
  displayName: 'Run PHP Tests'


